


- Room 1807, Unit 9, Building 2, Shangxing Commercial Street, Shangde Road, Shangxing Community, Xinqiao Subdistrict, Bao'an District, Shenzhen City, China
CONTACT US

WhatsApp

Aerospace & UAV
WJ Prototypes is your 3D manufacturing partner from prototype to large scale production.
Consumer Electronics
New Product Introduction Solutions for Consumer Electronics.

Robotics & Automation
Need some assistance bringing your robotic device or parts from the sketch-board to reality?
Medical Devices
The medical industry needs high quality, dependable and safe parts and products.
Automotive
New Product Introduction Solutions for Automotive
Industrial Machinery
The main purpose of industrial prototyping is to take the product from drawings into the real world.

Every british engineering team aiming for flawless prototypes knows that even a surface imperfection over 0.1 millimetres can undermine an entire vacuum casting project. Quality at each stage is absolutely crucial, from the master pattern to the final inspection. This step-by-step guide brings professional techniques and proven tips together, helping you create perfectly detailed parts that meet the highest standards every time.
| Key Insight | Explanation |
|---|---|
| 1. Create a Precise Master Pattern | Use photopolymer resin or silicone rubber to ensure accuracy and quality in your master pattern for vacuum casting. |
| 2. Properly Mix and Degas Resin | Carefully measure and mix polyurethane resin using precision tools to minimise bubbles and improve the final casting quality. |
| 3. Control the Pouring Process | Pour resin into moulds at a consistent angle and speed while maintaining vacuum pressure to prevent air entrapment and ensure detail accuracy. |
| 4. Execute Curing with Care | Use controlled thermal curing methods within recommended temperatures to solidify the resin without compromising its properties. |
| 5. Conduct Thorough Quality Checks | Systematically measure dimensions and inspect surface quality to ensure parts meet design specifications and functional requirements. |
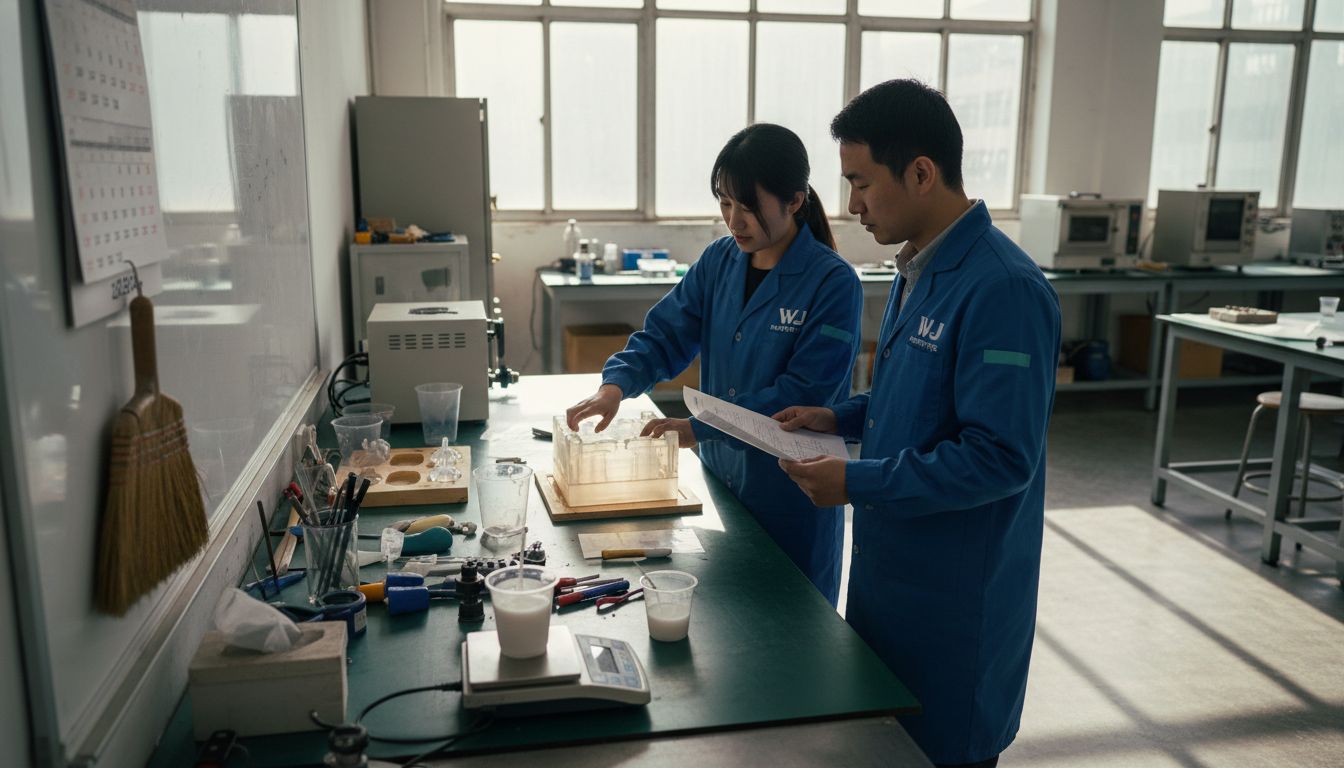
Preparing your master pattern and mould equipment represents the critical foundation for successful vacuum casting. This initial stage determines the precision and quality of your final prototype, requiring meticulous attention to detail and strategic equipment selection.
To begin, you'll want to create a highly accurate master pattern using materials like photopolymer resin or silicon rubber. Advanced pattern fabrication techniques from photolithography enable exceptional geometric complexity and surface resolution. Professional manufacturers typically use aluminium or silicone tooling to replicate intricate part geometries with micrometre-level accuracy. The master pattern serves as the primary reference model from which multiple duplicates will be produced.
Your equipment preparation involves selecting appropriate moulding materials and ensuring a clean, controlled workspace. High-quality silicone rubber remains the preferred casting medium due to its exceptional detail reproduction and flexibility. When preparing your mould, maintain a dust-free environment and use precision measurement tools to verify dimensional tolerances. A temperature-controlled workspace helps prevent material inconsistencies during the casting process.
Warning: Surface imperfections measuring more than 0.1 millimetres can significantly compromise part quality. Invest time in thorough surface preparation and inspection before proceeding to the casting stage.
Mixing and degassing polyurethane resin requires precision and careful technique to achieve high-quality vacuum casting results. This critical stage ensures your final prototype will have minimal imperfections and exceptional surface finish.
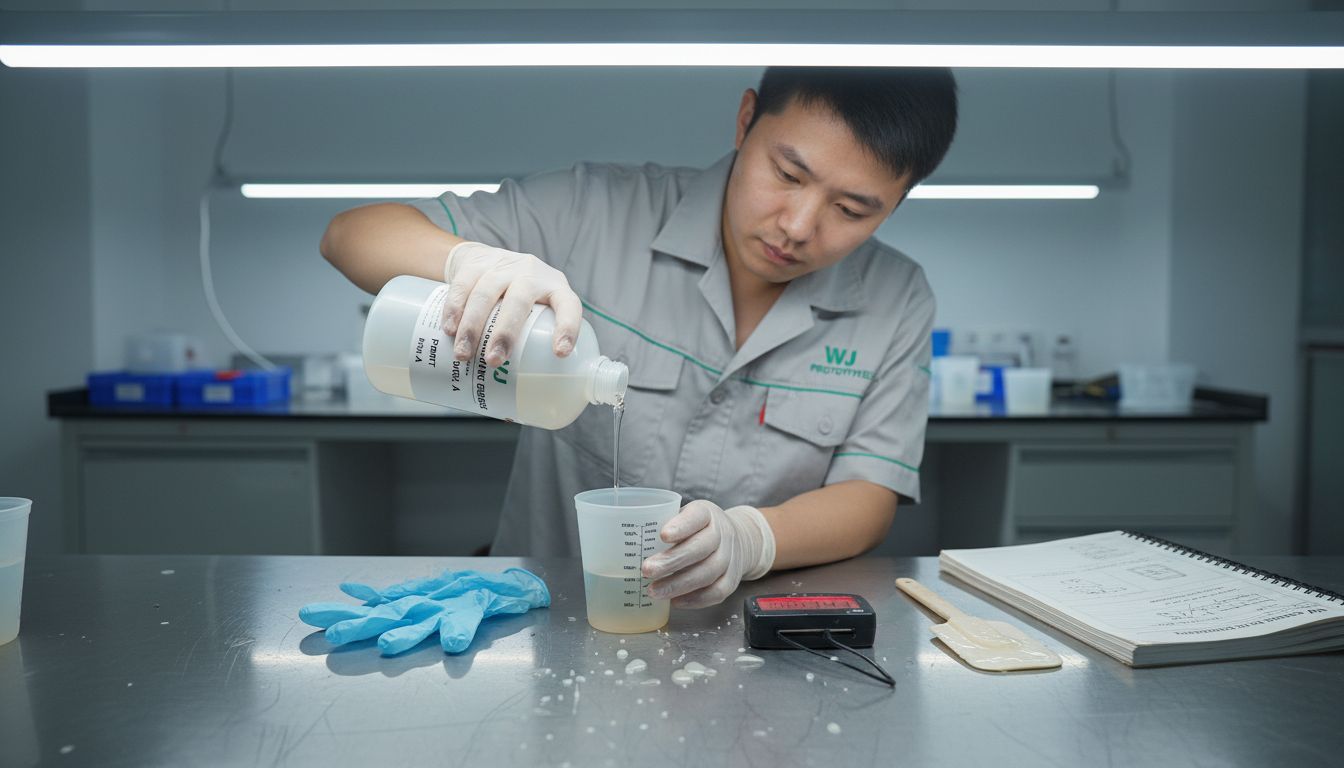 Advanced bubble reduction techniques are essential when working with polyurethane resins. Start by measuring your resin components precisely using digital scales calibrated to 0.1 gram accuracy. Combine the base and catalyst components systematically using a clean mixing container, ensuring thorough but gentle stirring to prevent air entrapment. Professional manufacturers recommend a slow stirring technique rotating at approximately 300 rotations per minute to minimise potential bubble formation.
The degassing process demands specialised equipment and careful monitoring. Place your mixed resin into a vacuum chamber and gradually reduce atmospheric pressure to remove microscopic air bubbles. Typical degassing cycles range between 5 to 10 minutes at 70 kilopascals of negative pressure. Vacuum degassing methods prove particularly effective for achieving crystal clear castings with exceptional dimensional accuracy.
Warning: Overmixing or aggressive stirring can introduce additional air bubbles, potentially compromising your casting quality. Always maintain a controlled environment and follow manufacturer recommendations for your specific resin type.
Pouring resin into silicone moulds under vacuum represents a precision technique critical for achieving flawless prototypes with exceptional detail and minimal imperfections. This stage transforms your carefully prepared resin mixture into a precise replica of your master pattern.Advanced vacuum casting techniques require meticulous preparation and controlled environmental conditions. Position your pre-degassed resin carefully above the silicone mould, ensuring a clean and dust-free workspace. Begin pouring slowly from one corner of the mould, allowing the resin to flow gradually and minimise potential air entrapment. The angle and speed of pouring significantly impact the final part quality.
The vacuum chamber plays a crucial role in this process. Maintain consistent negative pressure between 50 to 70 kilopascals during pouring to facilitate complete mould filling and eliminate microscopic air bubbles. Professional manufacturers recommend monitoring the resin flow carefully and adjusting chamber pressure as needed. Precise mould filling techniques ensure that every intricate geometric detail is captured with remarkable accuracy.
Warning: Sudden pressure changes or rushed pouring can introduce significant defects. Patience and controlled movement are key to achieving superior casting results.
The final stage of vacuum casting involves carefully curing your prototype and extracting it from the silicone mould without compromising its intricate details and surface quality. This critical phase transforms your liquid resin into a solid, functional prototype with precise geometric characteristics.Controlled thermal curing techniques are essential for achieving optimal mechanical properties. Preheat your laboratory oven to the specific temperature recommended for your polyurethane resin typically between 40 to 80 degrees Celsius. Place your mould with the cast part on a clean, flat tray and ensure even heat distribution. The curing duration varies depending on resin composition but generally ranges from 30 to 120 minutes.
Removing the cured part requires precision and gentle handling. Advanced demoulding strategies recommend gradually peeling the silicone mould away from the prototype using a consistent, low-tension technique. Start from one corner and slowly work your way around the part, minimising the risk of surface damage or deformation. Professional manufacturers often use specialised releasing agents to facilitate smoother mould separation and preserve the part's fine surface details.
Warning: Excessive heat or aggressive demoulding can introduce dimensional inaccuracies or surface imperfections. Always prioritise gentle handling and follow manufacturer specifications for your specific resin system.
The final stage of vacuum casting demands meticulous quality verification and precise surface finishing to transform your prototype into a professional grade component. This critical process ensures your manufactured part meets exact design specifications and performance requirements.Comprehensive quality inspection techniques require systematic evaluation across multiple parameters. Begin by conducting dimensional measurements using precision calibration tools such as digital micrometres and coordinate measuring machines. Check critical geometric features against original design tolerances within 0.1 millimetre accuracy. Visual inspection should involve examining surface texture consistency, identifying potential air bubbles or surface irregularities that might compromise part functionality.
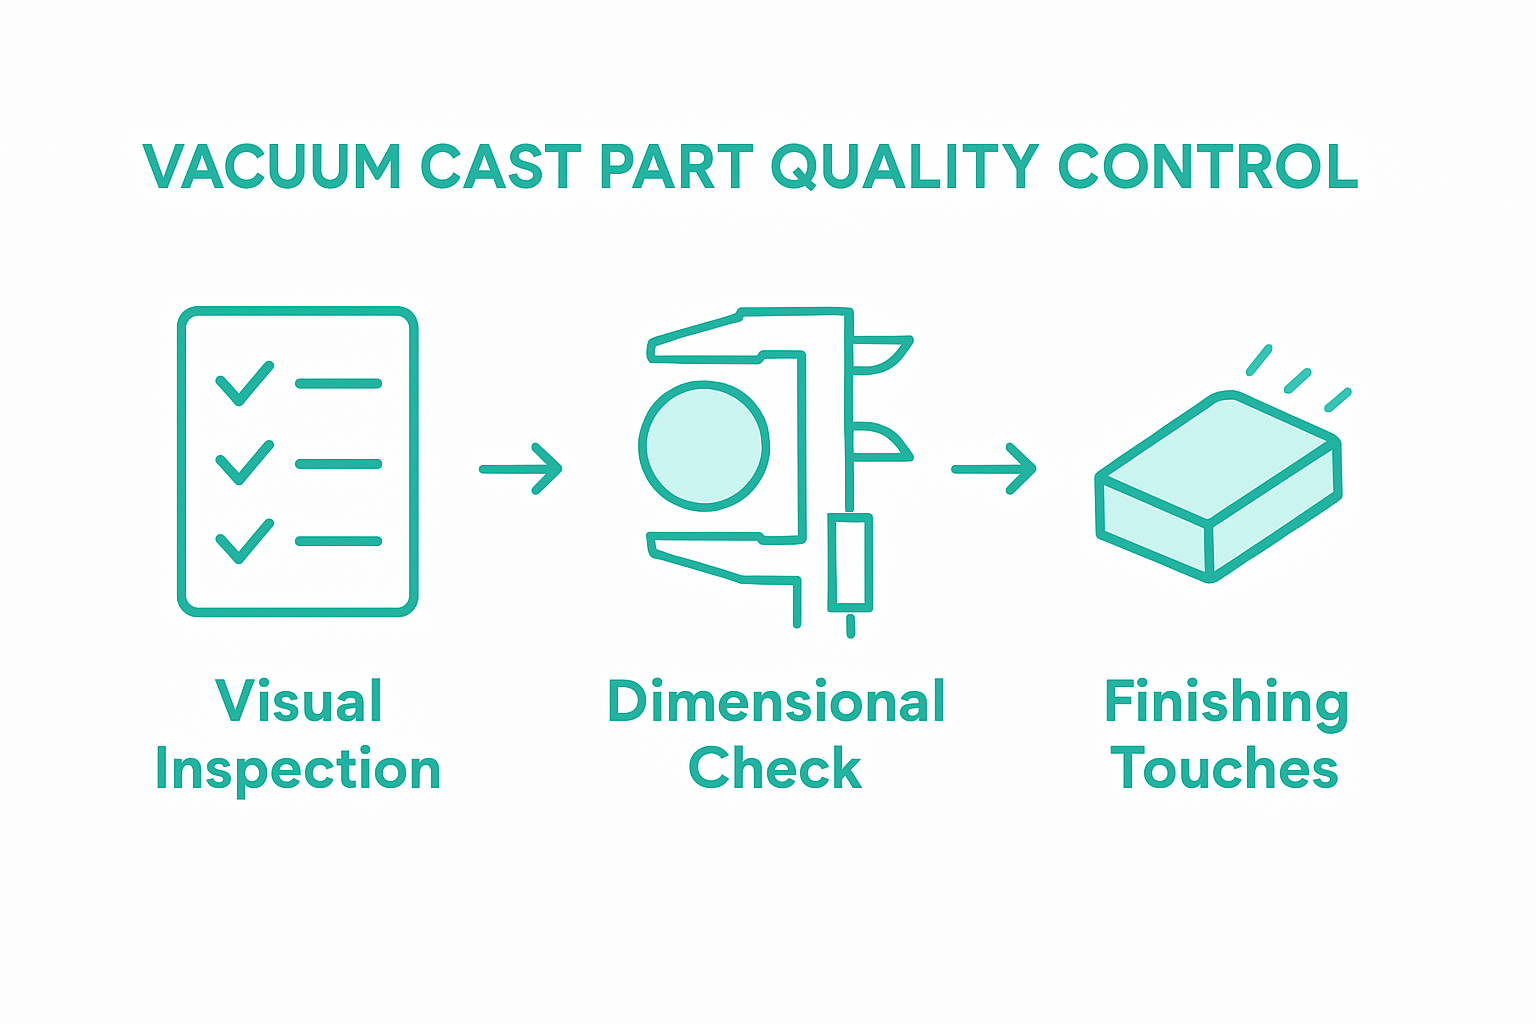
Professional finishing involves strategic post processing techniques tailored to your specific prototype requirements. Depending on your application, you might employ fine grit sandpaper for smooth surface refinement or specialised polishing compounds to achieve desired aesthetic and functional characteristics. Some industries require additional treatments like painting, electroplating, or applying protective coatings to enhance mechanical properties and environmental resistance.
Warning: Excessive finishing can alter part dimensions and potentially compromise precision. Always maintain a delicate balance between surface refinement and maintaining original geometric integrity.
Vacuum casting is a demanding process that requires exacting attention to detail from preparing master patterns to final part finishing. Challenges like preventing air bubbles during resin mixing or ensuring flawless mould pouring can impact the final prototype's accuracy and surface quality. You want fast, reliable, and high-precision results using controlled curing and careful demoulding techniques to bring your design to life without compromising dimensional tolerances.
At WJ Prototypes, we understand these critical pain points and excel at delivering superior vacuum casting services backed by advanced additive manufacturing and traditional fabrication capabilities. With expertise spanning SLA, CNC machining, and injection moulding, we provide tailored solutions that guarantee excellent detail reproduction and consistent quality. Partner with us for cost-effective prototyping and small batch production that supports rapid product development and market readiness.
Explore our complete range of manufacturing services at WJ Prototypes and discover how our skilled engineers apply industry best practices for vacuum casting and finishing. Ready to overcome vacuum casting challenges with precision and speed Contact our team today to get an instant quote and bring your prototype from concept to reality efficiently.
Using materials like photopolymer resin or silicone rubber is ideal for creating a master pattern. These materials offer high accuracy and intricate geometric configurations—ensure your method aims for micrometre-level precision.
To minimise air bubbles, use digital scales to measure your resin components precisely and stir gently at around 300 rotations per minute. Avoid aggressive mixing, as this can introduce air bubbles that detract from the quality of your final prototype.
The optimal curing temperature typically ranges between 40 to 80 degrees Celsius. Preheat your laboratory oven accordingly, and aim for the recommended duration of 30 to 120 minutes for consistent results.
To safely remove a cured part, gradually peel the silicone mould away using a consistent, low-tension technique. Start from one corner and work your way around, taking care to prevent surface damage and maintain the integrity of the part.
Effective finishing methods include using fine grit sandpaper for surface refinement and applying protective coatings to enhance durability. Carefully balance the finishing process to avoid altering part dimensions while achieving the desired aesthetic.
To verify the quality of your vacuum cast parts, conduct dimensional measurements with precision calibration tools and perform a visual inspection of the surface for any irregularities. Ensure measurements are within 0.1 millimetre accuracy to meet design specifications.
Why Choose Vacuum Casting: Everything You Need to Know
Vacuum Casting In China | Get A Quote For Vacuum Casting Services
Vacuum Casting in China Versus Global Quality Evaluation
Additive Manufacturing Guide for Precision Prototyping
How to Manage Spare Parts for Diesel Injection Experts
SERVICES
RESOURCES


