



- Room 1807, Unit 9, Building 2, Shangxing Commercial Street, Shangde Road, Shangxing Community, Xinqiao Subdistrict, Bao'an District, Shenzhen City, China
CONTACT US

WhatsApp


Contact Us
Our team is on stand by, waiting toassist you.

Videos
A large collection of educational videos and tutorials.

About Us
Learn about our company, leadership, and mission totransform manufacturing.

Privacy Policy
Applies to all personal information collected through and/or processed in connection.


Aerospace & UAV
WJ Prototypes is your 3D manufacturing partner from prototype to large scale production.

Consumer Electronics
New Product Introduction Solutions for Consumer Electronics.

Robotics & Automation
Need some assistance bringing your robotic device or parts from the sketch-board to reality?

Medical Devices
The medical industry needs high quality, dependable and safe parts and products.

Automotive
New Product Introduction Solutions for Automotive

Industrial Machinery
The main purpose of industrial prototyping is to take the product from drawings into the real world.


Insert molding places a finished component, usually metal, into the mold and injects plastic around it in one cycle. Overmolding molds a second material, usually a soft thermoplastic elastomer (TPE) or rubber-like resin, over a plastic or metal substrate that already exists. The two overlap, but the question that separates them is simple: is the thing you are molding around a separate, pre-made part (insert molding), or is the goal a second layer of material on a molded substrate (overmolding)? This guide compares the two on process, materials, tooling, cost, volume and design rules, so you can pick one before you freeze a drawing.
In insert molding, a pre-made component (a threaded brass insert, a stamped contact, a steel shaft, a sensor, even a magnet) is loaded into the open mold. The mold closes, resin is injected around the insert, and the part is ejected with the insert locked in place. The result is one assembled part with no secondary installation step such as heat staking or ultrasonic insertion.
The insert is retained mechanically: knurls, undercuts, grooves, holes and flats on the insert give the plastic something to flow into and grip. Chemical bonding between metal and plastic is not what you rely on.
Overmolding applies one material onto a substrate. The materials can bond through mechanical interlock, chemical compatibility or specific interactions between the two polymers, as described in Plasticomp’s technical paper on TPE overmolding. The substrate is typically a rigid thermoplastic such as PC, ABS, PC/ABS or nylon, but it can also be metal.
There are two common ways to run it:
The naming causes confusion. Some suppliers call overmolding a specific type of insert molding, because the first-shot part is simply the “insert” for the second. That is a fair description of the physics. In practice, engineers use “insert molding” for metal or other non-molded components and “overmolding” for a molded layer of a second plastic or elastomer.
| Factor | Insert molding | Overmolding |
|---|---|---|
| What is molded around | A pre-made component, often metal | A molded substrate, usually rigid plastic |
| Typical goal | Embedded threads, contacts, shafts, structural strength | Grip, sealing, soft touch, vibration damping, protection |
| Retention method | Mechanical: knurls, grooves, undercuts | Chemical bond, mechanical interlock, or both |
| Typical process | Load insert, mold, eject | Two-step with transfer, or multi-shot |
| Tooling | One mold, plus insert handling or fixturing | Two molds (two-step) or a more complex multi-shot tool |
| Best volume fit | Lower volumes, low upfront tooling | Two-step for low to medium; multi-shot for high volume |
| Main risk | Insert movement, contamination, plastic cracking at the insert | Poor adhesion, delamination, venting defects |
Inserts are most often brass, stainless steel, aluminum or plated steel, though ceramics, magnets, electronic components and pre-molded plastic parts are common. The molded resin is typically a engineering thermoplastic such as nylon, PC, ABS, PBT or PEEK, chosen for strength, temperature resistance and shrinkage behavior around the insert. Our injection molding materials list covers the resins we run.
Because plastic shrinks as it cools and a metal insert does not, residual stress builds around the insert. Thick, uniform plastic around the insert, rounded features and a resin with some toughness help prevent cracking later.

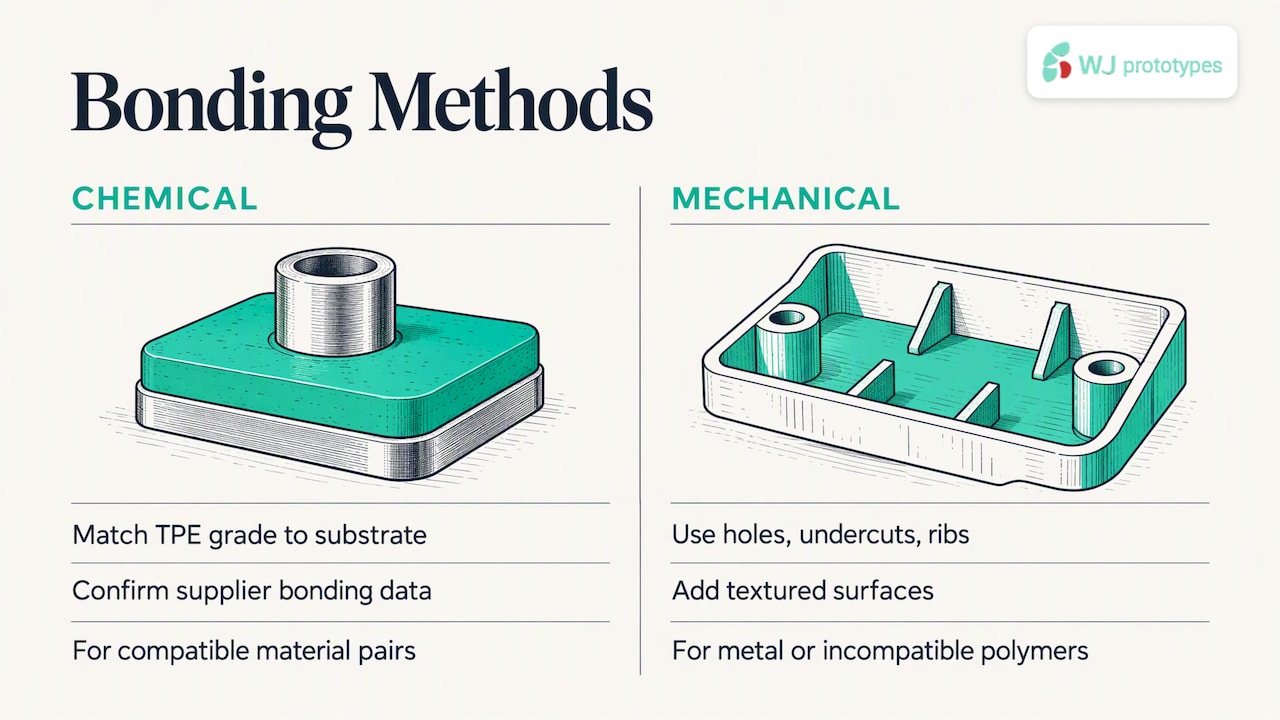
Overmold bonding depends heavily on the pairing. Avient’s GLS TPEs, for example, are formulated to bond to PP, PC, ABS, PC/ABS, nylon 6 and 6/6, copolyester, PS, HIPS, PC/PETG, acetal and PPO, and not every grade bonds to every substrate. That last point matters: you pick the TPE grade for the substrate, not the other way around, and you confirm it with the material supplier’s data.
When chemistry will not do the job, for example with a metal substrate or an incompatible polymer, the design has to carry the bond mechanically through holes, undercuts, ribs or textured surfaces. Covestro’s joining techniques guide lists metal inserts, snap fits, ultrasonic assembly and adhesive bonding among the ways thermoplastic assemblies are joined, which is a useful reminder that molding is only one of several options and that each has a different cost and reliability profile.
Both processes are sensitive to surface condition. Avient advises protecting inserts from dirt, dust, skin oil and mold release, and ideally moving a substrate straight into the second shot after molding. Preheating can help depending on the insert and TPE, but preheating nylon inserts is strongly discouraged because it can hurt adhesion with at least one of their grades. Put cleaning, storage and transfer time into the process plan, not just the part drawing.
No honest comparison gives a single price, because the numbers depend on part size, cavity count, material, tolerance and the number of inserts. What you can compare reliably are the cost drivers.
Tooling. Insert molding needs one cavity set, plus features to locate and hold the insert (pins, magnets, vacuum or a loading fixture). Two-step overmolding needs a mold for the substrate and a second for the overmold layer. Multi-shot tooling is the most complex, with a rotating or transferring core and two injection units, so it carries the highest upfront cost.
Labor and cycle time. Insert molding and two-step overmolding both involve loading or transferring parts. Multi-shot overmolding removes that handling. Avient’s guidance is that insert molding is typically chosen for lower production volumes or to minimize upfront tooling cost, while multi-shot overmolding is generally favored for high-volume programs, often above 250,000 units annually, or in high-labor-cost regions where it cuts cycle time and manual handling (source).
Assembly savings. The real comparison is rarely molded part against molded part. It is the molded assembly against the molded part plus the cost of installing inserts, applying adhesive, fitting a separate gasket or grip, inspecting it and managing the extra part numbers. A threaded insert that is heat-staked later may look cheaper per piece until you add the labor and the scrap from misaligned inserts.
Lead time. Prototype tools in aluminum or soft steel can shorten the first-article stage. Overmolding adds a validation loop for adhesion, so plan for at least one tool revision when the material pair is new.
A rough decision flow:
Most overmolding defects trace back to a handful of design choices. These guidelines draw on the supplier guidance cited above and on the RTP Company TPE guidelines.
For insert molding, apply the same logic with a few additions: keep a generous plastic wall around the insert, give the insert knurls or grooves, round the plastic corners at the insert, and design a positive locating feature so it cannot shift while resin packs around it.
| Defect | Likely cause | Design or process response |
|---|---|---|
| Overmold peels off | Incompatible materials, contamination, cold substrate | Confirm the material pair, keep the substrate clean, add interlocks, shorten transfer time |
| Short shots or air traps | Poor venting, thick-to-thin transitions | Add vents, smooth transitions, review gate position |
| Cracked plastic around an insert | Shrinkage stress, thin wall, sharp corners | Thicker uniform wall, radii, tougher resin |
| Insert shifts or tilts | Weak location, high injection pressure | Positive locating features, secure holding, adjust pack pressure |
| Flash at the insert | Insert tolerance or poor shutoff | Tighten insert tolerance, redesign the shutoff surface |
| Warpage | Uneven walls, mismatched shrinkage | Uniform wall thickness, coring, balanced cooling |
Choose insert molding for:
Choose overmolding for:
Use both when a part needs a metal insert for strength and a soft outer layer for sealing or grip. A power tool housing, a wearable sensor and a connector with a gasketed collar are typical examples.
Most of the overmolding and insert molding questions we get from engineers are really validation questions: will this material pair bond, will this insert survive molding, and will the tool hold up at volume? We design our workflow around answering those before production steel is cut.
Our approach is to treat the first run as an experiment. We pick the process that fits your volume, run a prototype tool, and test adhesion, insert retention and fit on real molded parts. With no minimum order quantity, a small validation batch is a practical way to settle the decision with data instead of a debate.
Insert molding is usually the lower-risk entry for hardware-heavy parts. Overmolding rewards the extra planning with parts that feel finished and need fewer components. A project manager stays with you through that choice, and our engineers review the design for wall thickness, draft, venting and interlocks before quoting.
Nas
A short validation plan avoids most late surprises:
We have written more on this in our guides to overmolding for product designers, deciding between overmolding and insert molding for China production and validating overmolding in two weeks. For the wider process, see our injection molding guide for accurate prototypes.
If you have a CAD file and a rough idea of volume, our injection molding service is the place to start. Upload the design for an instant online quote, tell us which inserts or overmold materials you are considering, and our engineers will confirm the specification and flag design issues before molding. We are an ISO certified manufacturer shipping worldwide, including to the United States, and we can also produce early visual or functional models with CNC machining or vacuum casting while the production tool is built.
Not quite. Insert molding embeds a pre-made component, typically metal, in molded plastic. Overmolding molds one material, usually a TPE, over a substrate. Some suppliers describe overmolding as a type of insert molding because the first-shot part acts as the insert, so check which meaning a quote uses.
It depends on volume and handling. Insert molding generally has lower upfront tooling cost and suits lower volumes. Multi-shot overmolding costs more to tool but can reduce labor and cycle time at high volumes, often above 250,000 units a year according to Avient’s guidance.
Yes, but the bond is usually mechanical rather than chemical, so the metal needs holes, grooves or texture, and the surface must be clean. Confirm the specific metal and elastomer pairing with the material supplier before tooling.
Aim for uniform walls, typically 1.5 to 3 mm, on both substrate and overmold. Use gradual transitions, radii in corners and 3 to 5 degrees of draft on long draws. Thin walls generally need mechanical interlocks.
Mold the substrate in your intended resin, then overmold it with the candidate TPE in a prototype tool and test adhesion on real parts. A small first batch with no minimum order quantity is a practical way to compare material pairs before production tooling.
SERVICES
RESOURCES