


- Room 1807, Unit 9, Building 2, Shangxing Commercial Street, Shangde Road, Shangxing Community, Xinqiao Subdistrict, Bao'an District, Shenzhen City, China
CONTACT US

WhatsApp

Aerospace & UAV
WJ Prototypes is your 3D manufacturing partner from prototype to large scale production.
Consumer Electronics
New Product Introduction Solutions for Consumer Electronics.

Robotics & Automation
Need some assistance bringing your robotic device or parts from the sketch-board to reality?
Medical Devices
The medical industry needs high quality, dependable and safe parts and products.
Automotive
New Product Introduction Solutions for Automotive
Industrial Machinery
The main purpose of industrial prototyping is to take the product from drawings into the real world.

TL;DR:
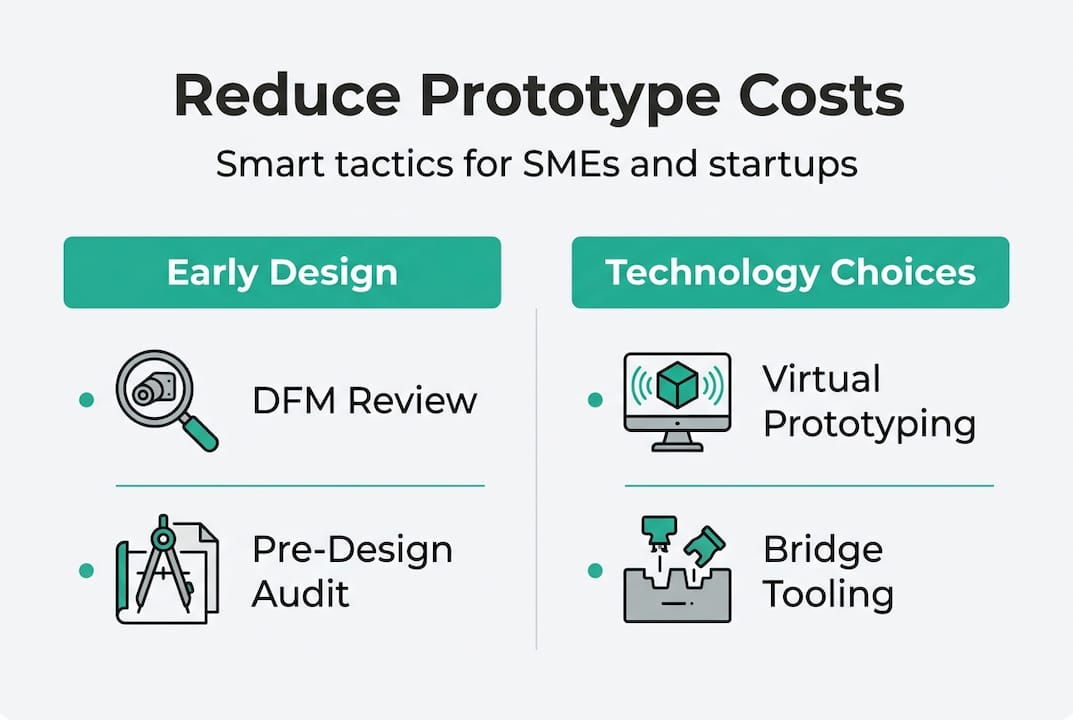
Early cost control relies on identifying design and process decisions that increase prototype expenses.
Virtual prototyping significantly reduces physical build costs and accelerates development.
Collaborating with suppliers during design reviews and choosing appropriate technologies optimizes costs.
Budget overruns are one of the most common reasons product launches stall at small and medium enterprises. Prototyping is not optional, but the way most teams approach it quietly burns through development budgets before a single production part is made. The good news is that most cost drivers are not random. They are baked into decisions made early in the design phase, which means they can be controlled. This guide walks through four proven pillars: early cost identification, virtual prototyping, smart technology selection, and supplier collaboration. Apply these strategies and you can cut prototype expenses significantly without compromising the quality your end product demands.
| Point | Details |
|---|---|
| Lock in savings early | Applying DFM with supplier input during initial design prevents most prototype overruns. |
| Go digital first | Virtual prototyping and simulation can replace most costly physical iterations and speed validation. |
| Use bridge tooling smartly | Aluminum prototypes fill the gap between concept and production at 40–60% lower cost than traditional methods. |
| Collaborate for impact | Partnering with suppliers reveals hidden costs and avoids expensive post-design changes. |
Prototype costs rarely appear out of nowhere. They trace back to two root causes: design complexity and process choices. When your team locks in tight tolerances, specifies exotic materials, or skips supplier input before finalizing specs, costs compound fast. Understanding where the money goes before you commit to a design is the single highest-leverage move available to any product team.
The most damaging hidden costs come from a short list of avoidable decisions:
DFM is the practice of designing parts so they are easier and cheaper to manufacture. It is not just an engineering checkbox. It is a cost control strategy. Early DFM can lower first-article costs by 20 to 30%, and supplier collaboration saves 20 to 40% in fabrication. That is not a marginal improvement. That is the difference between a project that stays on budget and one that does not.
Here is how common design choices affect prototype cost:
| Design choice | Cost impact | Recommendation |
|---|---|---|
| Tight tolerances (±0.001") | +40 to 80% per feature | Use standard tolerances unless critical |
| Exotic alloys or resins | +30 to 60% material cost | Validate function with standard materials first |
| Complex undercuts or cavities | +25 to 50% machining time | Simplify geometry where possible |
| Multiple surface finishes | +15 to 35% finishing cost | Limit finishes to functional surfaces |
| Early hard tooling commitment | +$20k to $100k+ risk | Use bridge tooling until design is stable |
The steps to prototype design matter as much as the design itself. Teams that follow a structured process catch these cost drivers before they become invoices. Reviewing manufacturing efficiency methods early in the project cycle gives your team a shared framework for trade-off decisions.
Pro Tip: Before locking final specs, run a pre-design audit with your fabricator. Ask them to flag any feature that adds cost without adding function. This single conversation can eliminate thousands of dollars in unnecessary complexity.
Explore competitive Rapid Prototyping Services with expert support from WJ Prototypes.
Whether you're comparing suppliers or looking to optimize costs, our team can help you evaluate the best option for your project.
👉 Request A Quote now or email us at info@wjprototypes.com to get started.
Every physical prototype you build costs money, time, and sometimes weeks of waiting. Virtual prototyping replaces a large portion of those builds with digital validation. The tools are more accessible than most SME teams realize, and the savings are substantial.
The three main simulation categories used in product development are:
Here is how to integrate digital simulation into your development process:
The cost difference between physical and virtual prototyping is not subtle. Virtual prototyping reduces development costs by up to 70% and cuts validation time by 29 to 39%. That kind of reduction changes the economics of your entire development program.
| Factor | Physical prototyping | Virtual prototyping |
|---|---|---|
| Cost per iteration | $500 to $50,000+ | $50 to $500 (software time) |
| Lead time per cycle | 1 to 6 weeks | Hours to days |
| Risk of design error | Discovered late | Caught early |
| Documentation | Manual inspection | Automated reports |
Understanding the rapid prototyping benefits of combining digital and physical methods helps teams decide when each approach makes sense. Pair simulation with the optimization checklist for 2026 to build a repeatable validation process.
Pro Tip: Schedule a digital validation round between every major design revision, not just at the start. Teams that do this consistently reduce their total physical build count by half or more.
Once you are ready to build physical parts, the technology you choose determines how much you spend and how fast you can iterate. Not every prototype needs the same process. Matching the method to the stage of development is where significant savings happen.
For early-stage development, additive manufacturing and urethane casting are your primary tools:
When your design stabilizes and you need 200 to 2,000 units, bridge tooling fills the gap between prototyping and full production. Aluminum molds are the standard choice here. Aluminum bridge tooling saves 40 to 60% compared to steel, and the crossover point where bridge tooling makes sense is typically 200 to 2,000 units. For SMEs, this translates to a 30% R&D cost reduction compared to jumping straight to production tooling.
Choose your prototyping method based on these factors:
The transition from rapid to bridge to production tools follows a clear sequence:
Skipping steps in this sequence is where teams lose money. Committing to a $50,000 steel tool before the design is stable is one of the most expensive mistakes in product development. How prototyping streamlines processes at each stage shows why sequencing matters. Teams that understand cutting costs with Chinese prototyping also gain access to competitive pricing at every stage of this sequence.
DFM is not something you do alone. The most effective DFM reviews happen when your engineering team and your fabricator are in the room together before any tooling is ordered. This is where the biggest savings are hiding.
DFM works by targeting the features that drive cost without driving function:
Before you finalize any design, ask your supplier these questions:
A medical device client avoided a $100,000 tooling mistake by sharing CAD files with their fabricator six weeks before the planned tool order. The supplier identified three features that required specialized inserts, adding $35,000 to the original quote. Redesigning those features took four days and saved the entire cost.
DFM reviews cut first-article costs by up to 30%, and tight tolerances add 40 to 80% cost per feature when they are not necessary. These are not theoretical numbers. They show up on every invoice where DFM was skipped.
Practical tactics for SMEs include stage-gate reviews at each design milestone, modular designs that allow component-level iteration without full redesigns, and a clear distinction between "looks-like" prototypes (appearance only) and "works-like" prototypes (functional validation). Mixing these two objectives in a single build adds cost without adding clarity. Learning how to choose rapid prototyping methods for each stage and how to speed up turnaround without inflating costs rounds out a complete cost reduction strategy. MES cost reduction strategies also offer a systems-level view for teams managing multiple concurrent projects.
Here is the uncomfortable reality: most prototype budget overruns are not caused by bad luck or supplier problems. They are caused by teams that confuse activity with progress. Building another physical prototype feels productive. Running another simulation round feels less tangible. But the data is clear, and the teams that consistently stay on budget have figured this out.
The highest-performing SME product teams we work with share one habit. They treat physical builds as confirmations, not explorations. Exploration happens digitally. When a physical part gets ordered, the team already knows what it should do and why. This discipline alone cuts build counts in half.
Perfect is genuinely the enemy of good enough in prototyping. Validate the critical functions virtually, then build the minimum required prototype to confirm what simulation cannot replicate. Lock your requirements early with supplier input, and you eliminate the post-tooling changes that cost months and tens of thousands of dollars. Teams that learn from top rapid prototyping practices apply this discipline consistently.
Pro Tip: Set a hard prototype budget cap at the start of every project. Then design your validation process to fit within it. Constraint forces better decisions than unlimited budgets ever do.
Applying these strategies is straightforward when you have the right manufacturing partner behind you. At WJ Prototypes, we work directly with product development teams at SMEs to identify cost reduction opportunities before tooling is ordered. Our CNC machining in China services deliver precision parts at competitive pricing, while our vacuum casting services give you production-quality parts without hard tooling investment. Whether you need rapid prototyping, bridge tooling, or low-volume production support, WJ Prototypes offers tailored solutions that balance cost, speed, and quality for teams that cannot afford to waste either time or budget.
Explore competitive Rapid Prototyping Services with expert support from WJ Prototypes.
Whether you're comparing suppliers or looking to optimize costs, our team can help you evaluate the best option for your project.
👉 Request A Quote now or email us at info@wjprototypes.com to get started.
Adopt virtual prototyping and simulations early. These methods can cut development costs by up to 70% before a single physical part is built.
Bridge tooling using aluminum molds is up to 60% cheaper than steel and handles 100 to 10,000 units, making it ideal between prototype and full production stages.
Yes. Roughly 70 to 80% of expenses are locked in during the design phase, so late changes cost far more than early DFM-led revisions.
Joint reviews with fabricators before tooling expose hidden cost drivers and process risks, reducing fabrication costs by 20 to 40% on average.
Guide To Cost-Effective Prototyping - Reducing Risks and Expenses
Why Prototyping Reduces Costs in Manufacturing
Why Prototyping in China Drives Down Costs for Manufacturers
Cost-Effective Prototyping in China | Guide for UK Manufacturers & Engineers
Cost reduction best practices for manufacturing success
Explore competitive Rapid Prototyping Services with expert support from WJ Prototypes.
Whether you're comparing suppliers or looking to optimize costs, our team can help you evaluate the best option for your project.
👉 Request A Quote now or email us at info@wjprototypes.com to get started.
SERVICES
RESOURCES


